Page 1
USB Bootloader Pro is designed to help companies add the ability to upgrade their products in the field over the Universal Serial Bus (USB). It has two main components:
- A small piece of firmware called a bootloader that gets programmed into the device in the factory. This bootloader is then capable of reprogramming the main firmware of the product in the field, without the need for special equipment.
- A PC program that reads a firmware hex file which contains new firmware to be programmed into the device in the field. When the device is connected to the PC and put into bootloader mode, the PC program then sends commands and data to the bootloader which causes the device to be reprogrammed.
Click on the image for page view.
Page 2
USB Bootloader Pro is designed to be simple for both developers and end users to use. It is also designed to be simple to deploy to end users, to allow easy product upgrades in the field. Let's have a look at the files we have provided.
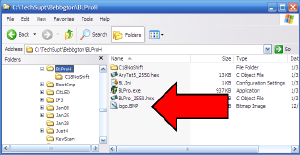
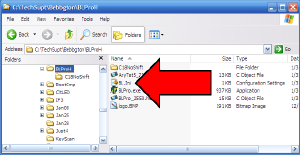
BLPro_2550.hex is the image of the bootloader itself, which you will program into the device at the factory. You would NOT deploy this file to your end user.
The files BLPro.exe, BL.ini, and Logo.bmp are associated with the actual PC program (BLPro.exe) that the end user runs on his PC, in order to upgrade his product.
The file AryTst5_2550.hex is a sample project that we will program into a device. You would deploy to your end user a similar hex file containing the actual code for your own product, in addition to the 3 files BLPro.exe, BL.ini, and Logo.bmp (or Logo.jpg or Logo.gif). For best results, all 4 files should be placed the same clean new directory on the end user's PC.
Click on the image for page view.
Page 3
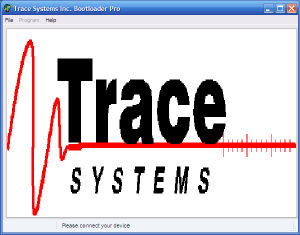
In this example, file Logo.bmp would be expected to contain an image of your company's logo. This image will be automatically displayed by BLPro.exe if the file name conforms to the following rules:
- The first name of this file must be "logo".
- The file extension (file type) may be one of the following:
- ".bmp" - Windows Bitmap format
- ".jpg" - JPEG format
- ".gif" - GIF format
Click on the image for page view.
Page 4
The configuration file, BL.ini, is a standard Windows INI file which contains information (easily editable in a text editor such as Windows NotePad) that determines how BLPro.exe will run, and what it expects to do. Let's take a look at what's inside BL.ini, by double clicking on it to view it in NotePad.
Click on the image for page view.
Page 5
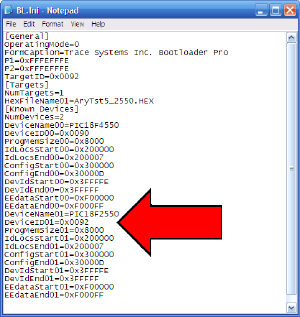
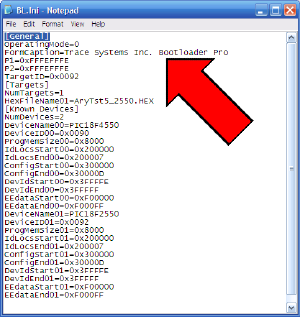
This is the entire contents of BL.ini. Like any Windows INI file, it is divided into sections whose names are surrounded in square brackets. BL.ini has sections called [General], [Targets], and [Known Devices].
The [Known Devices] section contains information about the PIC processors that the BLPro.exe program can work with. This first Alpha version only supports the 18F4550 and 18F2550 devices.
The TargetID item in the [General] section indicates that the device to be upgraded (reprogrammed) is expected to be an 18F2550 device, because the TargetID=0x0092 value matches the value of DeviceID01, the Device ID that is hard-wired into the 18F2550 processor.
Click on the image for page view.
Page 6
The item in the [Targets] section called HexFileName01 is the file name of the hex file that contains the firmware that will be programmed into the target processor to perform the upgrade.
In our example, this file is called AryTst5_2550.hex. The file name contains the suffix "_2550" to emphasize the fact that your firmware must be compiled to work in the same target processor that is specified with the TargetID.
Click on the image for page view.
Page 7
The FormCaption item in the [General] section shows the company name that will be displayed on the title bar at the top of the main window of BLPro.exe when it executes. This is where you may enter your own company name. The display of your own company logo and your own company name makes your customer think that your company wrote this field upgrade program, which gives your product a more polished, professional appearance.
The OperatingMode item at the top of the [General] section is most important -- it determines how you want the program to look and behave. This first Alpha version supports two values for OperatingMode:
0 - End User Upgrade mode
1 - Developer mode
Click on the image for page view.
|